10% off with code BACKTOSCHOOL through Monday 9/10 | Spend $1,500 for Free Shipping*
*Some locations excluded. Free Shipping excludes Synthetic Ice Products.
10% off with code BACKTOSCHOOL through Monday 9/10 | Spend $1,500 for Free Shipping*
*Some locations excluded. Free Shipping excludes Synthetic Ice Products.
Welcome to the EZ ICE Family!
Congratulations on your new EZ ICE PRO Home Arena System™, and welcome to the EZ ICE family. I’m excited for you to assemble your rink and start skating! My goal for EZ ICE is to get one million kids Off the Device and On the Ice.
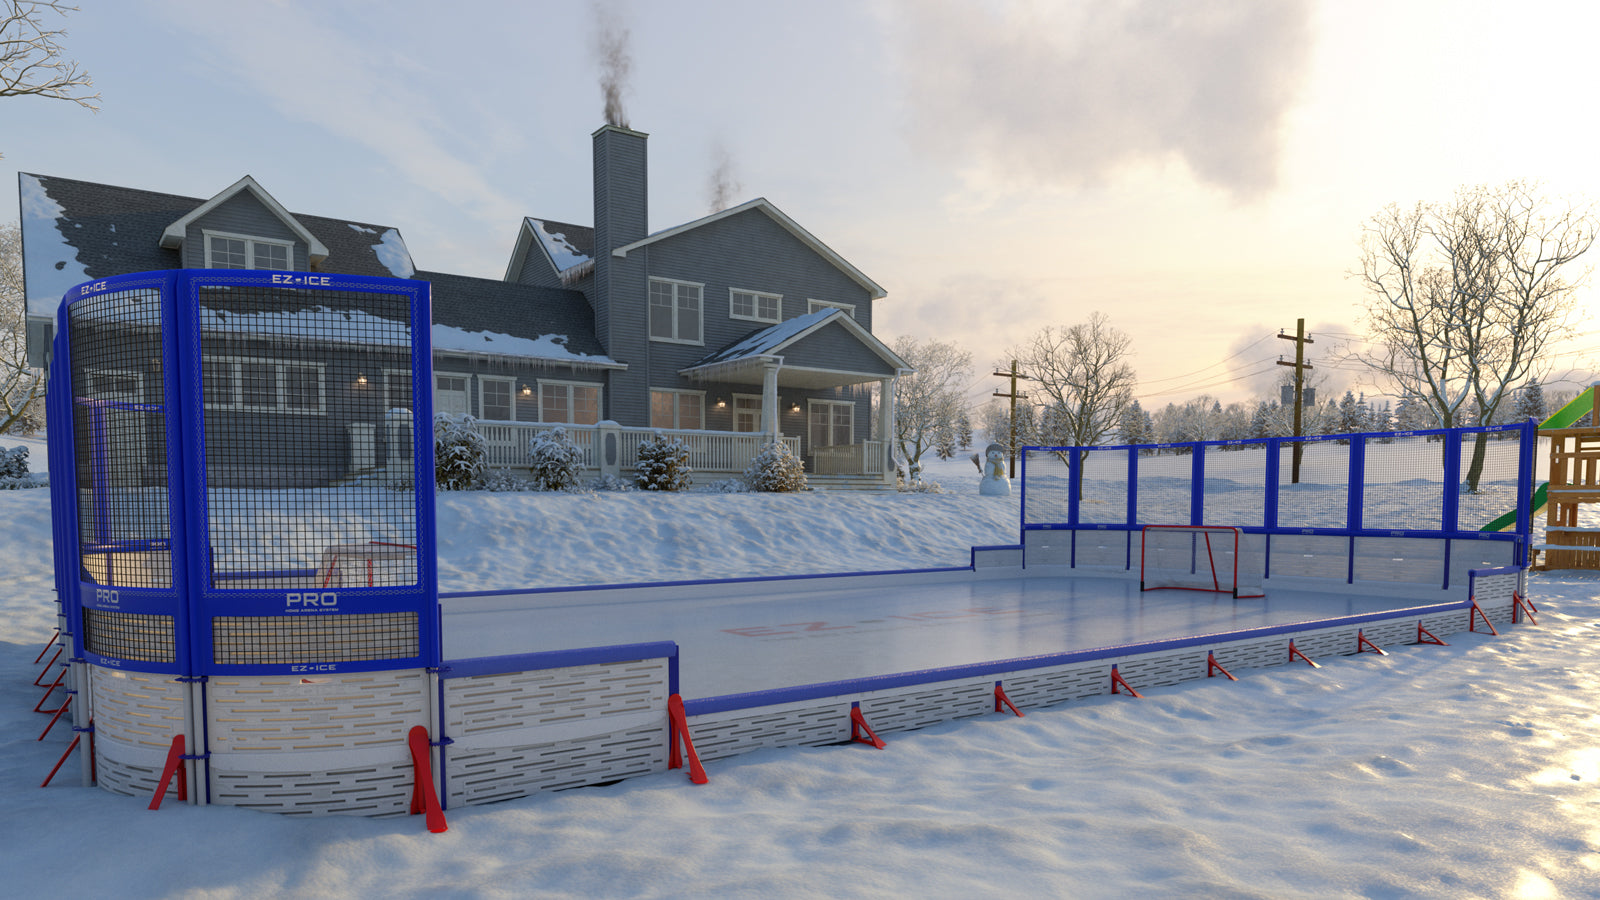
I grew up skating on an outdoor ice hockey rink in my backyard. My best childhood memories are skating for hours with friends and family, playing game after game with teammates, and then coming off the ice for my mom’s homemade hot chocolate and French toast. I invented The EZ ICE 60 Minute Backyard Rink™ in 2016 to bring these same childhood memories to thousands of kids and families across North America. Now, EZ ICE is taking outdoor hockey to the next level with the PRO Home Arena System. The PRO Home Arena System brings all of the thrills of a professional hockey rink right to your backyard, the same ease of assembly as our original rink.
All EZ ICE Rinks are designed for assembly on any flat surface without the use of tools. The EZ ICE Team is here to help you not only this year, but in future years as well. A team of Backyard Rink Experts is available to answer any questions you may have about the product, assembly, maintenance, and take-down. Feel free to give us a call at (262) EZ–ICE60 (262-394-2360), send an email to customer_experience@ezicerinks.com, or chat on our website at ezicerinks.com.
My team and I are here as a resource for you, and we want to make your winter with EZ ICE the best it can be. As part of the EZ ICE family, we hope that you will share your experiences with us. Don’t forget to send us your favorite pictures and videos of your rink and tag @ezicerinks in all of your social media posts. Let’s get started!
-Dylan Gastel, Inventor & CEO, EZ ICE Rinks

These instructions are for PRO Rinks and Upgrade Kits purchased after September 1, 2021. To view Assembly Instructions for the Original EZ ICE Rink, please click here.
Rinks with Classic Height Boards
PRO Straight Boards (each straight board is 5 feet/1.5 meter long x 16 inches /.41 meters tall)
(A) PRO Rounded Corner Boards, or
(B) Classic Height PRO Corner Connector (not included if you have Rounded Corner Boards)
PRO Classic Height Brackets with 1 Buckle each (if you have Rounded Corner Boards, you will have four (4) PRO Classic Height Rounded Corner Brackets with 2 Buckles each
Classic Height PRO Board Connectors to lock your boards in place
Straps
Liner (your liner should be larger than the rink itself to extend over the boards on all sides)
Liner Tape to repair knicks or tears
Silver Liner Clips
Bumper Caps (optional)
Rinks with Double Height Boards
Includes everything in the “Rinks with Classic Height Boards,” plus these substitutions:
Double Height PRO Corner Connector (not included if you have Rounded Corner Boards)
PRO Arena Height Brackets with 1 Buckle each (if you have Rounded Corner Boards, you will have four (4) PRO Arena Height Rounded Corner Brackets with 2 Buckles each
Double Height PRO Board Connectors to lock your boards in place
Also Included:
Safety Bumper Caps (included in Combo rinks)
Rinks with Arena Height Boards
Includes everything in the “Rinks with Double Height Boards,” plus these substitutions:
Arena Height PRO Corner Connector (not included if you have Rounded Corner Boards)
PRO Arena Height Brackets with 1 Buckle each (if you have Rounded Corner Boards, you will have four (4) PRO Arena Height Rounded Corner Brackets with 2 Buckles each
Arena Height PRO Board Connectors to lock your boards in place
Also Included:
Safety Bumper Caps (included in Combo rinks)
Rinks with PRO Netting (only available for Rinks with Arena Height Boards)
PRO Netting Panels for Straight Boards
PRO Netting Panels for Rounded Boards (only included in rinks with Rounded Corners)
PRO Net Holder Brackets
PRO Net Poles
PRO Net Sleeves
PRO Netting Panel Connectors
PRO Net Pole Caps
Double or Arena Height Rinks with Doors
All Full Double and Arena Height Rinks come equipped with an EZ ICE Door to get in and out of your rink. The EZ ICE Door (for Double Height Rinks) will take the place of 1 Straight Board.
The EZ ICE Door (for Arena Height Rinks) will take the place of 2 Straight Boards, taking up one 5 foot section of your wall. Be sure to factor this in when counting out your boards!
EZ ICE Door (for Double Height Rinks)
EZ ICE Door (for Arena Height Rinks)
All Board Connectors should come with end caps attached for safety. If yours did not come attached, please add them on.
Choose your space. Remember, EZ ICE rinks can handle up to 9 inches of slope - the difference between your lowest and highest points of the rink. Be sure to measure the slope of your yard before setting up your rink.
TIP: Measuring Slope
Even if your yard looks completely flat to the eye, it is still a good idea to measure it using a laser leveler or string with bubble level to be certain of your slope. Select an area of your yard that will have the least amount of slope.
Ensure that you will have enough room in your space for your particular rink. Note that the PRO Brackets extend about 15 inches beyond the rink. This will add extra space to the rink’s perimeter. We recommend factoring in an additional 2.5 feet to the total length and width of your rink to account for the PRO Brackets on all sides.
Once you’ve chosen a location, begin to visualize your rink. Lay the Straight Boards on the ground where the rink will go.
If you have a Double Height rink, you will have 2 layers of boards. If you have an Arena Height rink, you will have 3 layers. You may want to lay your 2nd (and 3rd) layer boards on the ground next to the first layer.
TIP: Your Liner
We recommend leaving your liner in the box until you are ready to add it on. This will minimize the potential for rips or damage to the liner. It is best practice to treat your liner, and the box it came in, with care. Avoid dropping the box, or using a boxcutter when opening it, as this can tear the plastic.
TIP: Rounded Corners
If you have Rounded Corners, make sure to include 2 Rounded Board sections per corner when counting the number of boards per side.
Next, lay the Brackets and Board Connectors on the ground where each board connects with the next. Each Bracket should have at least 1 (single) Buckle connected to it. Rounded Corner board brackets will have 2 (double) Buckles.
TIP: Classic vs Arena Height Brackets
In Classic Height sections, you will use the shorter red PRO Classic Height Brackets.
In Double and Arena Height sections, you will use the taller red PRO Arena Height Brackets.
TIP: Board and Corner Board Connectors
Be sure to use the appropriate sized Board Connectors for Classic, Double, and Arena Height sections.
If you have Square Corners, lay the 4 Corner Board Connectors at each corner of the rink.
If you have Rounded Corners, you will not have the Blue Corner Connectors. Instead, you will use the Board Connectors in between the Rounded Boards. There should be 1 Bracket with 2 Buckles at each Rounded Corner intersection.
Leave all other parts for later steps.
TIP: Installing on snow
Try not to install the rink on top of snow. If there is more than 1-2 inches of snow on the ground, we recommend clearing it away before setting up your rink.
Board Spacers: Our engineers have designed a solution to secure EZ ICE Rinks in locations with high winds. If you live in an exceptionally windy area, please reach out to us for these Board Spacers.
Whether you have a Classic, Double, or Arena Height Rink, let’s start with your first layer.
Begin by connecting 2 Straight Boards together. Stand one board up straight, while sliding the Board Connector down it, so the two pieces interlock. Place the Board in the slot of the red PRO Bracket. The brackets should sit at the junction of the two boards, as close to the seam of the two boards as possible. The triangle part of the bracket should be outside of the rink.

Then, slide the second Board down the Board Connector, placing it in the slot of a second red PRO Bracket. This is your first connection.

Make sure the Bracket Buckles are pulled under the Bracket and sit inside the rink.
TIP: Rinks with Netting
Please note, if you have Netting, place the Brackets slightly to the right or left of the Board Connectors. The Bracket should not sit right at the seam between the boards. This is to make room for the Net Poles later.
s
Continue these steps around the perimeter of your rink, until you have the correct number of boards on all sides.
If you opted for Netting on your Arena Height Rink, slide a Net Holder onto the Arena Board Connectors. This will go in between the first and second layer of boards. If you have Square Corners, be sure to use the Square Corner Net Holder for the Corner Nets. If you have Rounded Corners, be sure to use the Rounded Corner Net Holders for the Corner Nets.

Before moving on, it can’t hurt to recount the boards, to make sure you have the correct amount on each side.
Assembling Corners
For a Square Corner, slide the Corner Connector between the two boards of the corner to form a 90 degree angle. This corner will have 2 Brackets, and 2 Straps - one for each board. Make sure the two Buckles from this corner are sitting inside the rink. One strap should run along the length, and one along the width.
For a Rounded Corner, slide the Board Connector between the 2 Rounded Boards. This corner will have 1 Bracket, at the intersection between the 2 Rounded Boards, and 2 Buckles. Make sure both Buckles are pulled inside the rink and form 90 degree angles from the one Bracket at the corner. One strap should run parallel with the length of the rink, while the other will run parallel with the width.

Now, begin laying out your straps for the perimeter of the rink. Each Strap clicks in with a Buckle from the opposing Bracket.
TIP: Laying out Straps
You should NOT have any diagonal straps. All straps should run length or width-wise to your boards.
When all Boards and Brackets are in the correct position, clip each Strap to the Bracket Buckles on either side of the rink.
Make sure the straps run parallel to the length and width and are pulled tight. There should not be any excess slack in the straps.

TIP: Clicking in your Straps
It is important to double check that your straps are clipped together properly, to ensure they can hold your rink together. Make sure you hear the audible “click” when the straps buckle into place. If you do not hear the “click,” the strap is not locked in place. Each strap buckle fits together in only one direction. If the buckles do not fit together, do not force them to fit. Try turning either the Strap or Buckle over. To test your buckle, tug on either end to ensure it is locked in place.
Now let’s put your liner on. Your liner will go on after setting up one layer of boards, even if you have a Double or Arena Height rink.
TIP: Inspecting your Liner
After taking your white Liner out of the box, inspect it for any holes. Tears in the liner may cause your rink to leak after it has been filled. Remember, when transporting your liner to your rink, do not drag it across the ground, as this may cause tears.
TIP: Laying out the Liner
The liners are the heaviest components of an EZ ICE kit. Depending on the size of your liner, it may take some adjusting to line up. Be sure to center the liner in your rink, so there is roughly the same amount of excess plastic hanging over all sides. You may want to ask your family members, kids, or neighbors to help with this part.
TIP: Larger Liner
We intentionally send liners that are at least 5 or 10 feet longer in length and width than your rink. Larger liners mean you have enough extra room to fold the liner over your boards. If you do not like the look of the excess plastic hanging over the side of your boards, simply fold it under your Brackets, or trim the end with a box cutter or scissors. Liners do not need to be perfectly even, as long as it covers the entire rink. Remember, the goal is a functioning ice rink!
To place the Liner, center it over the rink and drape the edges over the top of the Boards. Start by lining it up correctly lengthwise, with enough excess to fold over the boards on both ends. Then unfold it, and adjust it along the width.
If you have a Double or Arena Height rink, you will need to pull the liner out around the Board Connectors. You may have to bunch it around the poles a bit.
Hold off on adding the Liner Clips until after your rink is filled with water.
Classic Height Rinks, skip to Step 3 for filling your rink. All variations of Double and Arena Height Rinks should continue reading. If you opted to add PRO Netting to your Arena Height rink, check out the “Adding On Netting” section of Step 2 to add your netting before reading ahead.
Now that your liner is on, you can start adding your Double or Arena Height boards.

Stack the second layer of boards on top of your first layer. Similar to the first layer, line your first Board up in between two Board Connectors, above a first layer board. You may need to pull the liner out so it drapes over the first layer board, as you slide on the second layer. This part is even easier with two people! Repeat this around the rink as needed until your second layer is complete.
If you have any variation of Hybrid Double Height or Arena Height Rinks that escalate from Classic to Double stacked sections, or Double to Arena Height sections, your kit will include Safety Bumper Caps. For ensured safety, simply slip a Safety Bumper Cap on the corner of any board that escalates between Classic to Double or Double to Arena Height sections.
Assembling the Door
All rinks that do not have Classic Height sections (those with 2 or 3 layers of boards around the entire rink) will come equipped with an EZ Door to get in and out of your rink.
Decide where you want the EZ Door to go. Be sure there is room outside the rink to step in and out. The EZ Door will open into the rink.
Simply slide the EZ Door down the Board Connectors as you would a regular board. The door will take the place of 2 Straight Boards stacked on top of each other, in your second and third layer. So, this section of your rink will have 1 Straight Board stacked below the EZ Door.
Adding on the Net
If you opted to add PRO Netting to your Arena Height rink, continue reading. If not, you may skip this section.
Connect two 5 foot Net Poles together using the Pole Connector to make a 10 foot section. Repeat until all Poles are 10 feet.
Add your rubber PRO Net Pole Caps to the top of each of the 10 foot PRO Net Poles. These should pop right on, and are an added safety measure.
Slide the second Net Holders onto the Arena Board Connectors. This will go in between the second and third layer of boards. If you have Square Corners, be sure to use the Square Corner Net Holder for the Corner Nets.
Slide the Net Poles into the Net Sleeves.

Slide the Net Poles in Sleeves into PRO Net Holders. This will keep them upright. Make sure the Poles are facing the correct side up. Be sure to use the Straight Nets for the Straight Boards, and Corner Nets for the Corners.

For Rinks with Double Height, skip to Step 3 for filling your rink. All rinks with Arena Height should continue reading. If you opted to add PRO Netting to your Arena Height rink, check out the “Adding On Netting” section of Step 2 to add your netting before reading ahead.
For all variations of Arena Height Rinks, repeat this process for the third layer of boards. Your boards will be triple stacked in the areas with Arena Height.
Finding the Right Time to Fill
Water freezes at temperatures below 32 degrees F/0 degrees C. It is best to fill your rink when the outside temperatures, especially overnight temperatures, are consistently below freezing. Most rinks filled in freezing temperatures should take about 2-3 days to freeze.

TIP: Filling the rink
In most situations, all you need is a garden hose to fill your rink. Simply place the hose inside the rink and turn it on. It may take several hours to fill. If you want a faster fill, hire a local water company to fill your rink with a truck. This is a good option for customers with well water at their homes.
Fill the rink until the water in the shallowest end reaches the Minimum Fill Line, marked on the boards. This should be at about 3 inches of water. Do not exceed the Maximum Fill Line of 12 inches of water anywhere in the rink.
Once your rink is full of water, you may add on the Liner Clips. These will keep the liner held down against wind or other elements. Liner Clips are optional for sections with Double and Arena Height boards.
Wait for the water to freeze. This timeframe can vary depending on the size of your rink and the temperatures, but should normally take 2-3 days. Deeper rinks may take longer.
In our opinion, all you need for ice maintenance is a wide shovel and a hose. However, we have seen customers rig together some pretty cool homemade zambonis, and other rink maintenance tools. If this interests you, we suggest searching on Youtube or other online platforms for “home-bonies” that can help maintain the ice.
Shovel and Hose Maintenance:
After a day or night of heavy skating, use a wide shovel to scrape off excess snow and ice from the rink’s surface.
After the surface is cleared, spray about ⅛ inch of water on the entire surface using a garden hose.
Let the water freeze completely. The rink will be smooth for the next skate.
MAINTENANCE TIPS:
Snowstorm coming? Try to shovel the snow off the ice as quickly as possible. Leaving snow on the rink for an extended period of time will insulate the ice, which will cause it to melt.
Slush on the ice? It’s best to just leave the slush. Do not try to shovel it off or walk on the rink while it is slushy. This will leave footprints/shovel marks on your ice, which will be difficult to get out later. Instead, wait for temperatures to drop and for the slush to fully freeze. Then, try one of these methods to even out the surface:
Scrape debris off the ice with a shovel.
Pour hot water on the ice to melt away the debris.
Resurface with a hose for smooth ice.
Leaves falling on the ice? Remove fallen leaves and other debris from the rink as soon as you can. Even if they have frozen into your ice, it is best to dig them out. Otherwise, they will attract sunlight and melt a hole in your ice.
Outdoor ice skating has inherent risk of serious injury, drowning, or death. You assume all risks and danger of personal injury arising from or related in any way to the use of your EZ ICE Rink. Use of the product by a user is at the user’s risk. Children must be supervised by an adult at all times. Hockey equipment, including a helmet and face shield, should be worn at all times when using the product. No claims, representations or warranties, whether express or implied, are made by EZ ICE as to the safety, reliability, durability, and performance of any of EZ ICE’s products, and all such representations or warranties are disclaimed. Furthermore, EZ ICE accepts no liability whatsoever for the safety, reliability, durability, or performance of any of our company’s products, and all remedies are expressly excluded, including, without limitation, special, punitive, direct, indirect, and consequential damages. Please see our website, www.ezicerinks.com for full policies on warranty, shipping, terms of use, and privacy.